After a rough day or even an exciting, exhilarating one, it’s often difficult to decompress and unwind enough to fall asleep. Getting a little extra stretching and breath in through some bedtime yoga before attempting to doze off makes it easier to get to sleep, and helps reach a more contented sleep that yields better rest.

RELATED ARTICLE: Melatonin Pills for Better Sleep, Is It Safe?
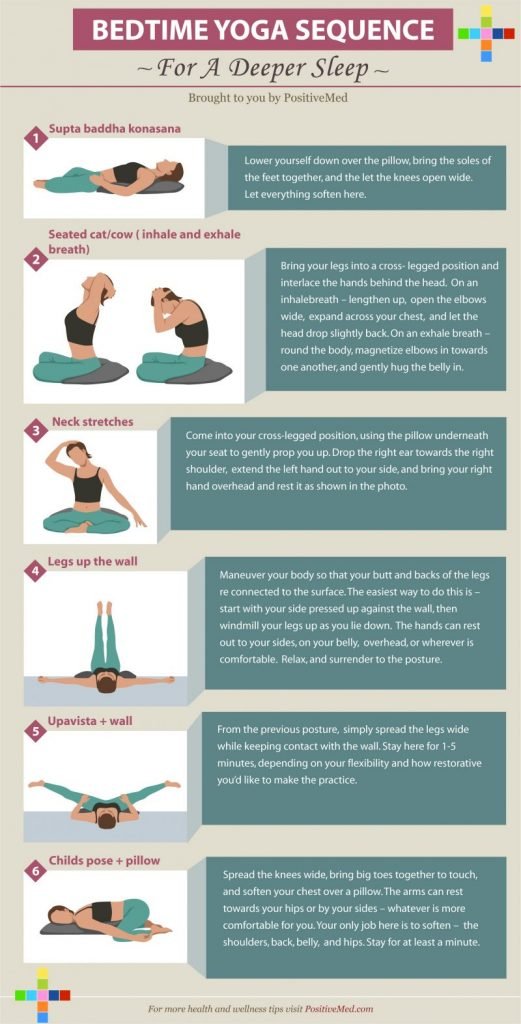
Position One – Supta Baddha Konasana
This position is essentially lying back on a large pillow with the soles of the feet brought together and the knees open wide. Rest your knees on pillows if you have hip issues. Bring the feet further from the body if you have inner thigh flexibility issues.
Let everything soften here while you take several deep breaths through the nose. This position should relax you for the rest of the sequence.

Position Two-Seated Cat/Cow
Sit in a cross-legged position. Place your buttocks on a pillow or folded blanket if it’s more comfortable or allows you to sit up in a more upright position. Interlace your hands and place them behind your head, then inhale and arch up while taking a deep breath in. Let your head drop slightly back. Then exhale and round the back, hug the elbows in and pull the belly in.
If your neck hurts at any point, modify your movement on the next repetition. Take care not to pull the head down with the hands when exhaling and rolling down. Repeat this for 8 to 10 deep breaths.
Position Three- Neck Stretches
Remain in the seated cross-legged position, on the blanket or pillow you used in the last posture, if you like. Extend one hand to your side and place the palm or fingertips to the floor. Reach the other arm straight up, then place the arm over the head and rest the hand just above the opposite ear. Pull the head to the side gently with the hand on the head, without force.
READ ALSO: 4 Ways to Use Yoga Blocks to Improve Flexibility
If you have cervical neck issues, use care not to force this stretch. Breathe deeply, and hold for two to three breaths per side. Repeat if desired.
Position Four- Legs Up the Wall
Lay flat on your back with your buttocks against a wall and your legs pointing straight up. Let your arms rest wherever you want. Hold this pose for at least 8 to 10 deep inhalations and exhalations.
If you have trouble getting into this pose, lay on your side with your rear against the wall, then shoot yourself into position. If the wall provides too much pressure on your back or torso, you can modify by using a chair and putting your legs at 90-degrees.
Position Five- Upavista
Stay in the prior position and spread the legs wide while keeping contact with the wall. Make sure the backs of the knees keep touching the wall. Place a pillow underneath the buttocks if the low back hurts.
Stay in this position from one to five minutes.
Position Six-Childs pose
Sit on the knees, placing a pillow in front of you. Let the knees come apart as you lean over them to lay on the pillow. You can also let the arms come to the sides or above your head if it’s more comfortable. Hold this position for at least a minute, or for as long as you like.
Let the knees come apart as much as possible if you need more space for the low belly to relax. Don’t hesitate to cushion the knees if they hurt while kneeling.


